|
Attaching Oiler Control Wires:
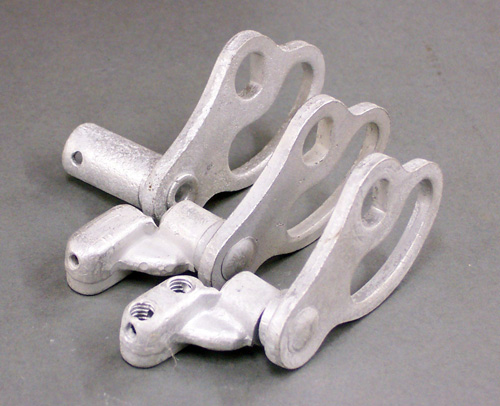
There were several variations of oil pump cam shaft
control levers used on the 45” twins throughout the years.
Cam shaft control lever #711-29 was used in 1929,
#712-30A in 1930 & 1931, and #712-32 in 1932 & 1933.
Control lever #711-29 and lever #712-30A both use a
brass casting to attach the control wire and look
almost identical with the exception of control
wire screw holes. Control lever #712-32 looks
quite different using a tubular shape piece of
steel to attach the wire which is also missing
control wire screw holes.
For control levers with screw holes, the means
to attach the control wire is obvious, but for
the levers without screw holes, we must devise
a method for attaching the control wire.
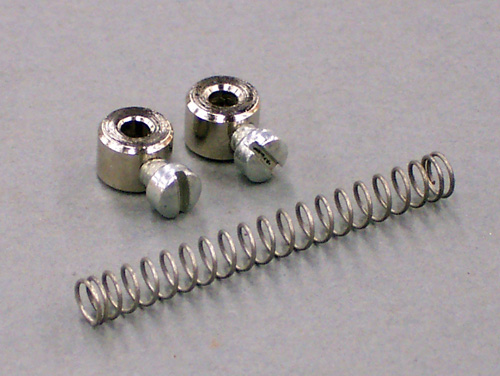
To attach the oiler control wire to the control lever,
the factory used a small metal tube that slipped
over the control wire ahead of the control lever
and was crimped onto the wire. Behind the control
lever was a spring and an adjustable stop collar.
Although none of these parts appear in any spare
parts books, they can clearly be seen in most
rider’s hand books from the same period.
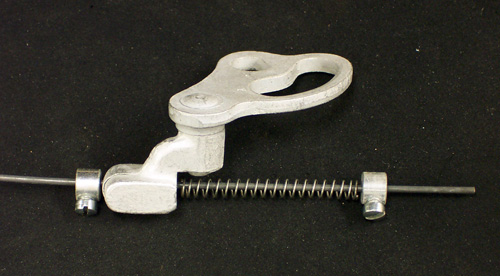
When the throttle control spiral is twisted toward
the rider, it “pushes” the control wire to deliver
more oil. When the spiral is twisted away from the
rider, it “pulls” the control wire to deliver less
oil. With the stop collars and spring oriented as
shown above, the control wire is prevented from
sliding loose of the second collar when the spiral
is fully twisted away from the rider. It was not
until 1934 that the oil pumps were fitted with a
safety return spring that would move the adjusting
plate to the fully open position in the event the
control wire became disconnected.
Before the oiler control wire can be adjusted,
the throttle control wire must first be adjusted.
With the throttle control wire adjusted, close the
throttle spiral all the way. Rotate the oiler
control lever clockwise until it stops, slide
the left stop collar along the oiler control wire
until it stops against the control lever and tighten.
Next, install the spring and second stop collar.
|
